Tips
newtbot_starter.py
enable commandline completions with:
$ source tbottest/completions.sh
fast testcase development
If you develop linux testcases it is a timeconsuming task always to power on the board and boot into linux. Best you open a shell window and boot into the boards linux.
Than open a second shell window and use ssh for login into the linux running on the board. This will save you a lot of time.
Example
shell window one:
$ ./tbottest/newtbot_starter.py @tbotconfig/BOARDNAME/args/argsBOARDNAME tbottest.inter.linux

tbot starting ...
├─TBOT.FLAGS {'boardfile:tbotconfig/BOARDNAME/BOARDNAME.ini', 'noethinit', 'picocom', 'inifile:tbotconfig/BOARDNAME/tbot.ini', 'do_power', 'useifconfig'}
├─boardname now foobar
├─Using kas file kas-denx-withdldir.yml
FILENAME  ~/temp/tbotconfig/foobar/tbot.ini-modified
├─Calling linux ...
[...]
│   ├─Press CTRL+] three times within 1 second to exit.

BOARDNAME-linux: ~>
Now, you cannot use the serial console, as it is already used, so be sure ssh login works for you on your board!
So create a new argumentsfile for login into a running linux, see Argumentfile for ssh login
Example:
$ cat tbotconfig/BOARDNAME/args/argsBOARDNAME-ssh
@tbotconfig/BOARDNAME/args/argsBOARDNAME
-fnopoweroff
-falways-on
-fssh
-fnouboot
in another shell window, start tbot with argsBOARDNAME-ssh file:
$ ./tbottest/newtbot_starter.py @tbotconfig/BOARDNAME/args/argsBOARDNAME-ssh tbotconfig.tc.<your fancy testcasename>
tbot starting ...
├─TBOT.FLAGS {'nouboot', 'do_power', 'boardfile:tbotconfig/BOARDNAME/BOARDNAME.ini', 'inifile:tbotconfig/BOARDNAME/tbot.ini', 'ssh', 'useifconfig', 'always-on', 'nopoweroff', 'noethinit'}
├─boardname now foobar
FILENAME  ~/temp/tbotconfig/BOARDNAME/tbot.ini-modified
├─Calling <your fancy testcasename> ...
[...]
linux
reboot
If you need to test the linux reboot command use this:
@tbot.testcase
def lnx_check_reboot(
    lab: linux.LinuxShell = None,
    lnx: linux.LinuxShell = None,
) -> str:  # noqa: D107
"""
simply try 50 reboots without power off
"""
failure = False
oldflags = tbot.flags.copy()
try:
    tbot.flags.add("nopoweroff")
    tbot.flags.add("linux_no_cmd_after_login")

    loop = 0
    loopmax = 50
    res = False
    while loop < loopmax:
        tbot.log.message(tbot.log.c(f"loop {loop} from {loopmax}").yellow)
        with tbot.ctx() as cx:
            lab = cx.request(tbot.role.LabHost)

            lnx = cx.request(tbot.role.BoardLinux, reset=res)
            lnx.exec(linux.Raw(f"(sleep {REBOOT_SLEEP} && reboot) &"))

        res = True
        loop += 1

except:
    failure = True

tbot.flags = oldflags.copy()
board_power_off()

if failure:
    raise RuntimeError("lnx_check_reboot failed")
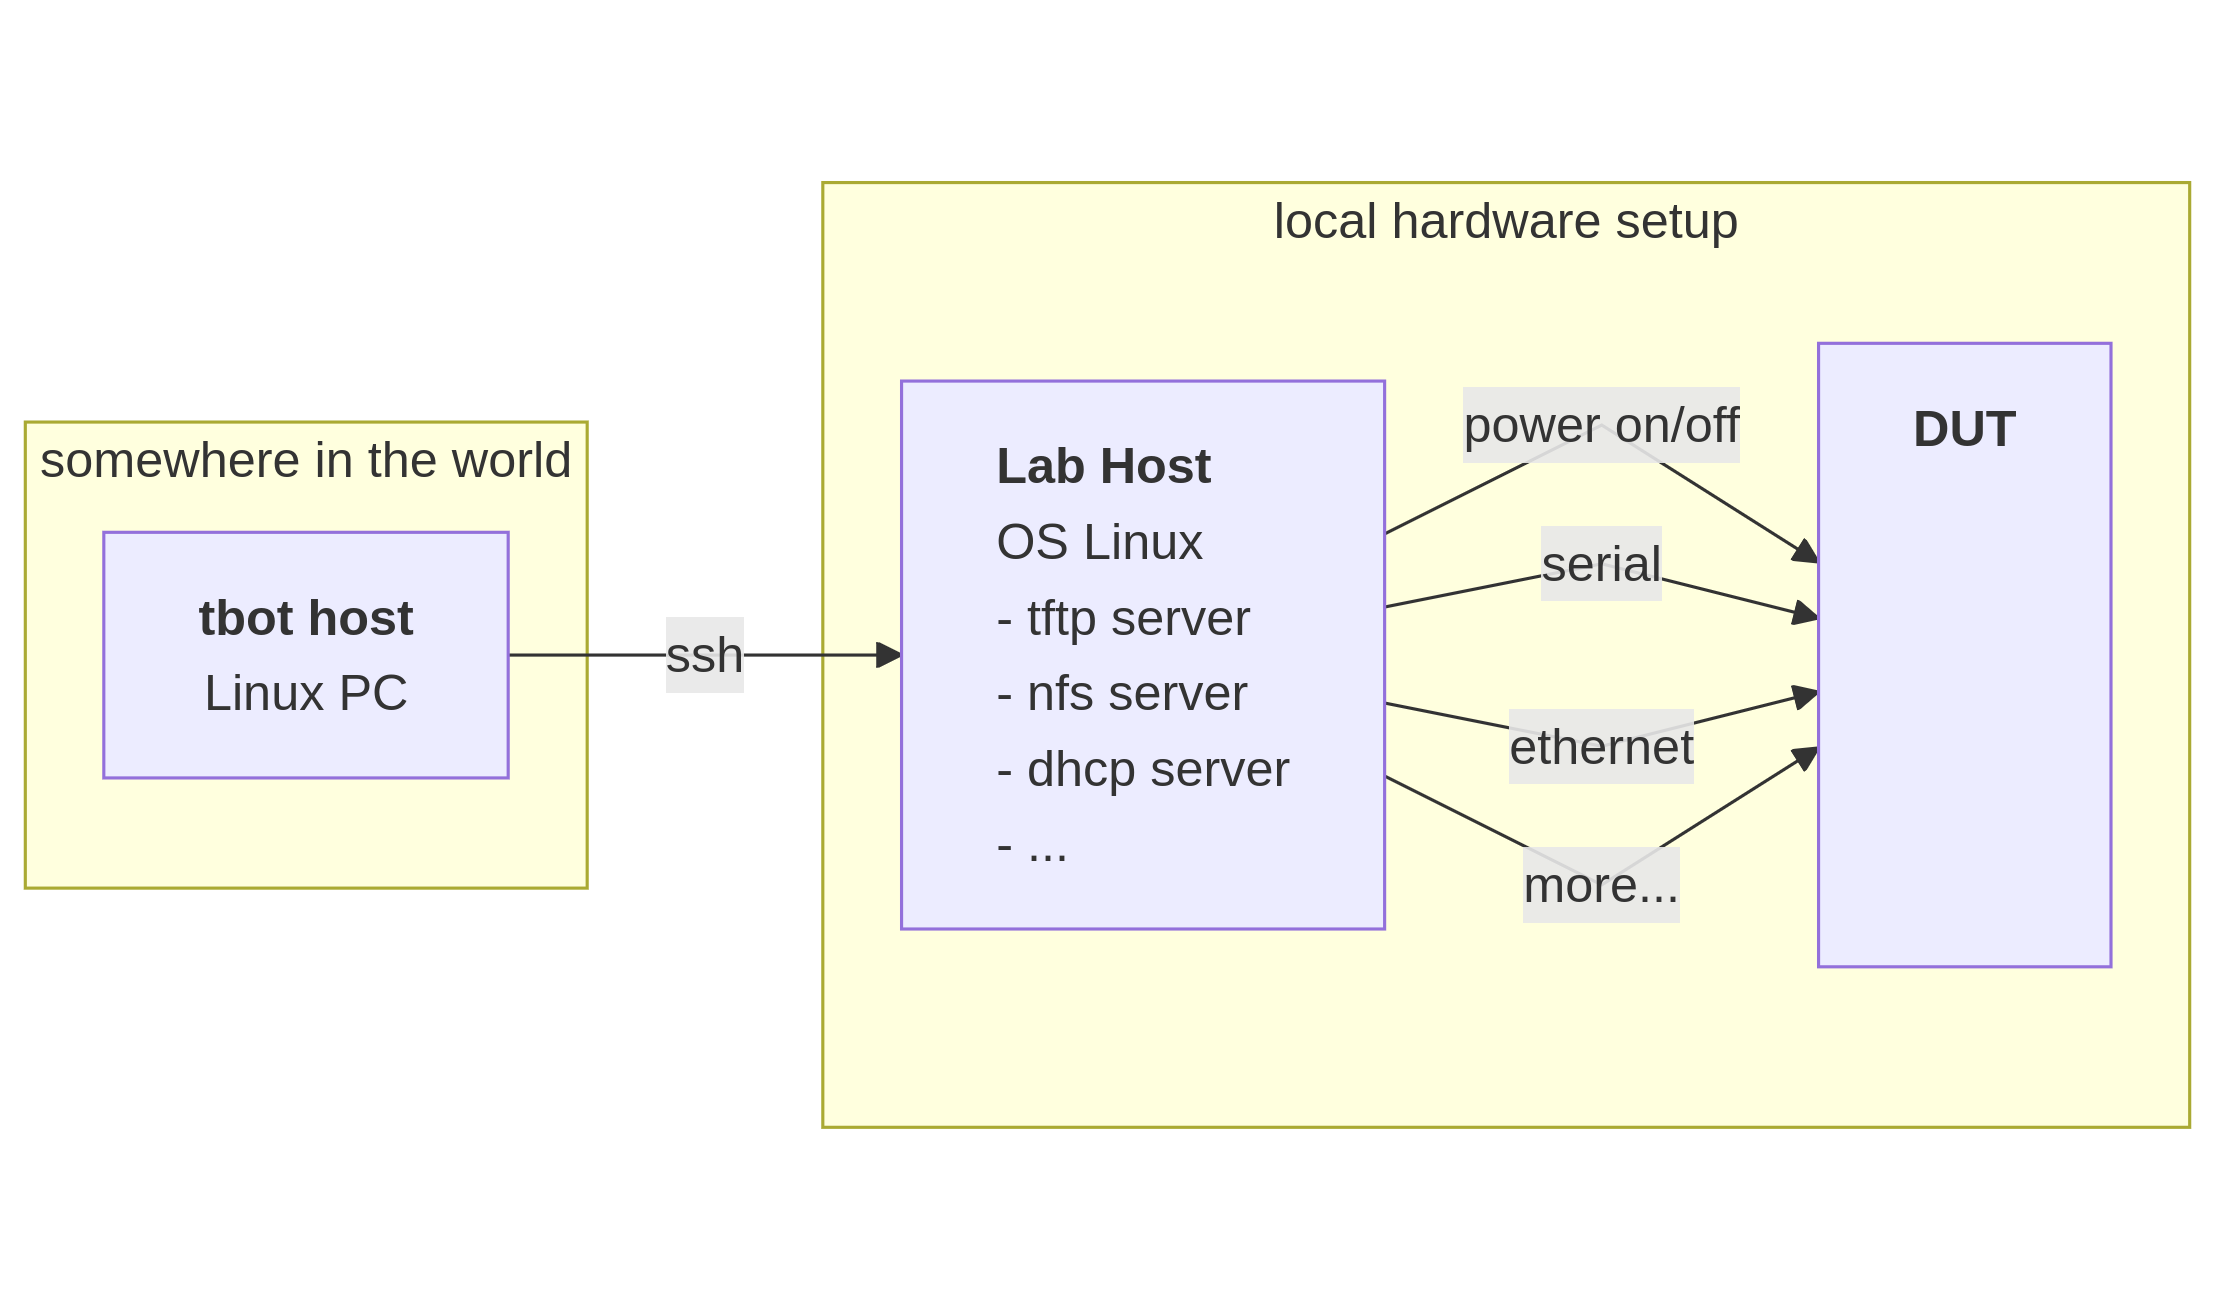
lab setup
I mostly use as a lab host an raspberry pi as a lab host. It is cheap, does not consume much power and it has a wifi and an ethernet interface.
If I need a new “lab”, I simply clone a sd card, do some setup stuff and I am ready to go!
So for connecting to the world I use the wifi interface and for local testing the board, the ethernet interface. This approach is very flexible, as I put the lab host with the DUT and all needed stuff into a plastic box. And I only need a powerconnector for running it.
Here some setup tricks to get PI working as lab host
My setup is always
with a raspberry PI as lab host.
setup ssh
check that all ssh commands work without sudo or password!
Setup your hostname in
/etc/hostname
/ets/hosts
Install vim and create .vimrc
pi@pilab-9:~  $ cat /home/pi/.vimrc
set tabstop=4
set shiftwidth=4
set expandtab
set mouse-=a
syntax on
if has("autocmd")
  au BufReadPost * if line("'\"") > 1 && line("'\"") <= line("$") | exe "normal! g'\"" | endif
endif
activate ssh and generate keys
https://www.raspberrypi.org/documentation/remote-access/ssh/passwordless.md
https://www.raspberrypi.org/documentation/remote-access/ssh/
bash and git
for bash and git do this:
add in /home/pi/.bashrc
function parse_git_branch_and_add_brackets {
    git branch --no-color 2> /dev/null | sed -e '/^[^*]/d' -e 's/* \(.*\)/\ \[\1\]/'
}
PS1="\u@\h:\W \[\033[0;32m\]\$(parse_git_branch_and_add_brackets) \[\033[0m\]\$ "

git config --global core.editor "vim"

# ignore commands beginning with space in history
# and ignore duplicates
HISTCONTROL=ignoreboth:erasedups
$ cat /home/pi/.bash_aliases
alias vi=vim
alias gcp="git cherry-pick"
alias gl="git log --decorate=full"
alias gll='git log --decorate=full --pretty=format:"%h %an, %ar : %s"'
alias glg="git log --graph --pretty=format:'%Cred%h%Creset -%C(yellow)%d%Creset %s %Cgreen(%cr) %C(bold blue)<%an>%Creset' --abbrev-commit --date=relative"
alias lst="ls -al --sort=time -r"
alias lss="ls -a | sort"
alias gs="git status"
alias gr='f(){ git rebase -i HEAD~"$1";  unset -f f; }; f'
add search in bash history with ctrl and arrow up:
https://askubuntu.com/questions/59846/bash-history-search-partial-up-arrow
$ cat ~/.inputrc
"\e[1;5A":      history-search-backward
"\e[1;5B":      history-search-forward
"\e[1;5C":      forward-word
"\e[1;5D":      backward-word
picocom
$ sudo apt-get install picocom
sispmctl
I use this powercontorller for powering on boards (or other stuff) in my lab setup:
It works very reliable for me.
For powering on/off use the commandline tool:
$ sudo apt-get install sispmctl
did not worked for me, so I build it from source:
https://github.com/xypron/sispmctl
you need the following udev rules:
$ cat /lib/udev/rules.d/60-sispmctl.rules
SUBSYSTEM=="usb", ATTR{idVendor}=="04b4", ATTR{idProduct}=="fd10", GROUP="sispmctl", MODE="660"
SUBSYSTEM=="usb", ATTR{idVendor}=="04b4", ATTR{idProduct}=="fd11", GROUP="sispmctl", MODE="660"
SUBSYSTEM=="usb", ATTR{idVendor}=="04b4", ATTR{idProduct}=="fd12", GROUP="sispmctl", MODE="660"
SUBSYSTEM=="usb", ATTR{idVendor}=="04b4", ATTR{idProduct}=="fd13", GROUP="sispmctl", MODE="660"
SUBSYSTEM=="usb", ATTR{idVendor}=="04b4", ATTR{idProduct}=="fd15", GROUP="sispmctl", MODE="660"
and add sispmctl in /etc groups
sispmctl:x:125:pi
don;t forget to reload rules with:
$ sudo udevadm control --reload-rules
sudo without password
https://linuxconfig.org/configure-sudo-without-password-on-ubuntu-20-04-focal-fossa-linux
gpio
a very good and (at least for me) stable gpio adapter for the raspberry PI is:
based on
https://www.waveshare.com/wiki/RPi_Relay_Board_(B)
see the links for the description and for downloading drivers.
usb hub power control
$ git clone https://github.com/hevz/hubpower.git

$ cd hubpower

$ gcc -o hubpower hubpower.c


$ sudo ./hubpower 1:2 status
Port  1 status: 0503  High-Speed Power-On Enabled Connected
Port  2 status: 0100  Power-On
Port  3 status: 0503  High-Speed Power-On Enabled Connected
Port  4 status: 0100  Power-On
Port  5 status: 0303  Low-Speed Power-On Enabled Connected

$ ./hubpower 1:2 power 1 off

$ ./hubpower 1:2 power 1 oon
$ ./hubpower 1:2 bind
add static IP
I did not get it yet, how I really setup PI with a static IP.
:-(
Hope I can update this her e soon.
tftpserver
install tftpd-hpa with config file
pi@pilab-3:~  $ cat /etc/default/tftpd-hpa
# /etc/default/tftpd-hpa

TFTP_USERNAME="tftp"
TFTP_DIRECTORY="/srv/tftpboot"
TFTP_ADDRESS="0.0.0.0:69"
TFTP_OPTIONS="--secure --ipv4 -v -v"
useful commands:
$ sudo netstat -anp|grep 69
$ journalctl --all --no-pager -u tftpd-hpa
$ sudo systemctl --all --no-pager restart tftpd-hpa
sudo apt-get remove --purge tftpd
libftdi1 1.4
https://www.intra2net.com/en/developer/libftdi/download.php
$ apt-get install libusb-1.0 libconfuse-dev
install as described in readme
$ sudo make install
sdmux
$ git clone git://git.tizen.org/tools/testlab/sd-mux
install as described in readme, may you need to install some packages
$ sudo apt-get install cmake libpopt-dev libftdi1-dev
Warning
As the PI mounts the sd card automagically, disable this!
$ cat /etc/udev/rules.d/80-udisks2-nosdcard.rules
# do not automount sd card

SUBSYSTEMS=="usb", ENV{UDISKS_IGNORE}="1"
and do:
$ systemctl restart udisks2.service
jlink
download:
https://www.segger.com/downloads/jlink/
https://www.segger.com/downloads/jlink/#ESforARM
https://www.segger.com/downloads/jlink/#J-LinkSoftwareAndDocumentationPackBeta
uncompress it and
$ sudo cp 99-jlink.rules /etc/udev/rules.d/
$ sudo udevadm control --reload-rules
$ sudo udevadm trigger
swupdate
If we want to use swupdate-client.py you need to install:
$ pip3 install websockets --user
nfsserver
https://www.elektronik-kompendium.de/sites/raspberry-pi/2007061.htm
setup workdir and nfs subdir
$ sudo mkdir /work
$ sudo chmod 777 /work
$ mkdir /work/pi
$ mkdir /work/pi/tbot-workdir
$ mkdir /work/pi/tbot-workdir/nfs
$ sudo apt-get install nfs-kernel-server
server config:
pi@pilab-9:~  $ cat /etc/default/nfs-kernel-server
# Number of servers to start up
RPCNFSDCOUNT=8

# Runtime priority of server (see nice(1))
RPCNFSDPRIORITY=0

# Options for rpc.mountd.
# If you have a port-based firewall, you might want to set up
# a fixed port here using the --port option. For more information,
# see rpc.mountd(8) or http://wiki.debian.org/SecuringNFS
# To disable NFSv4 on the server, specify '--no-nfs-version 4' here
RPCMOUNTDOPTS="--manage-gids"

# Do you want to start the svcgssd daemon? It is only required for Kerberos
# exports. Valid alternatives are "yes" and "no"; the default is "no".
NEED_SVCGSSD=""

# Options for rpc.svcgssd.
RPCSVCGSSDOPTS=""
folders exported config:
pi@pilab-9:~  $ cat /etc/exports
/work/pi/tbot-workdir/nfs  192.168.3.0/255.255.255.0(rw,no_root_squash,sync)
/work/pi/tbot-workdir/nfs  192.168.7.0/255.255.255.0(rw,no_root_squash,sync)
After changes on this files do not forget:
$ sudo exportfs -ra
$ sudo service nfs-kernel-server restart
dhcp server installation on PI
wlan0 = wi-fi to outer space
eth0 = dev network
I use this dhcp server:
https://help.ubuntu.com/community/isc-dhcp-server
installation on PI with:
pi@pilab-9:local $ sudo apt-get install isc-dhcp-server
and use this config file
pi@pilab-9:local  $ cat /etc/dhcp/dhcpd.conf
option domain-name "pilab.local";
option domain-name-servers 8.8.8.8, 8.8.4.4;

default-lease-time 6000;
max-lease-time 7200;

ddns-update-style none;

authoritative;

subnet 192.168.3.0 netmask 255.255.255.0 {
  range 192.168.3.1 192.168.3.100;
  option subnet-mask 255.255.255.0;
  option broadcast-address 192.168.3.255;
  option routers 192.168.3.1;
}
pi@pilab-9:local  $ cat /etc/default/isc-dhcp-server
INTERFACESv4="eth0"
INTERFACESv6=""
install chrony on PI
$ sudo apt-get install chrony
To enable NTP server daemon add in `/etc/chrony/chrony.conf`
local stratum 10
allow 192.168.3.0/16
the last line `allow...` limits NTP server for eth0 interface only!
Hint
install chrony commandline tool on DUT
pass NTP server address through DHCP to the DUT
add option:
option ntp-servers 192.168.3.1;
in file `/etc/dhcp/dhcpd.conf`. You can than use the NTP server
address in udhcpc scripts in variable `ntpsrv`
configure chrony to get NTP server address from DHCP
first ensure NTP server address is passed to the DUT via DHCP, see
pass NTP server address through DHCP to the DUT
create on the target a config file for chrony in your DHCP clients configuration scripts.
For example udhcpc setup
add `/etc/udhcpc.d/60-set-chrony-ntp-server` with
#!/bin/sh

echo "Calling /etc/udhcpc.d/60-set-chrony-ntp-server ntpsrv ${ntpsrv}"

CHRONYCONFIG=/var/run/chrony.d
mkdir -p $CHRONYCONFIG

echo server ${ntpsrv} > $CHRONYCONFIG/ntpserver.conf
echo allow ${ntpsrv} >> $CHRONYCONFIG/ntpserver.conf
Now when your udhcpc starts and get the NTP server address, it should
call `/etc/udhcpc.d/60-set-chrony-ntp-server` which creates chrony
configuration file `/var/run/chrony.d/ntpserver.conf`
Don;t forget to add `/var/run/chrony.d` in `/etc/chrony.conf`,
so that chrony scans config files in `/var/run/chrony.d`
# add other config directories chrony can use
confdir /var/run/chrony.d
Now if chrony starts, it passes the config files in `/var/run/chrony.d`
and so, get the NTP server address from udhcpc. Of course, ensure, that
chrony starts after udhcpc is finished.
enable Internet access from DUT over ethernet
uncomment in /etc/sysctl.conf
net.ipv4.ip_foward=1
install iptable support with:
$ sudo apt-get install iptables-persistent
and create the following rules:
$ sudo iptables -t nat -A POSTROUTING -o wlan0 -j MASQUERADE
$ sudo iptables -A FORWARD -i wlan0 -o eth0 -m state --state RELATED,ESTABLISHED -j ACCEPT
$ sudo iptables -A FORWARD -i eth0 -o wlan0 -j ACCEPT
and save this rules with the following command:
$ sudo netfilter-persistent save
$ sudo netfilter-persistent reload
the rules are stored in this file:
$ sudo cat /etc/iptables/rules.v4
# Generated by xtables-save v1.8.2 on Wed Aug  9 11:30:33 2023
*filter
:INPUT ACCEPT [0:0]
:FORWARD ACCEPT [0:0]
:OUTPUT ACCEPT [0:0]
-A FORWARD -i eth0 -o wlan0 -j ACCEPT
-A FORWARD -i wlan0 -o eth0 -m state --state RELATED,ESTABLISHED -j ACCEPT
COMMIT
# Completed on Wed Aug  9 11:30:33 2023
# Generated by xtables-save v1.8.2 on Wed Aug  9 11:30:33 2023
*nat
:PREROUTING ACCEPT [0:0]
:INPUT ACCEPT [0:0]
:POSTROUTING ACCEPT [0:0]
:OUTPUT ACCEPT [0:0]
-A POSTROUTING -o wlan0 -j MASQUERADE
COMMIT
# Completed on Wed Aug  9 11:30:33 2023
now a ping for example to google.com from your DUT should work!
Found this tips here:
https://serverfault.com/questions/267580/linux-routing-traffic-between-two-networks-with-iptables
May it does not work, so your routing table should look like:
# route
Kernel IP routing table
Destination     Gateway         Genmask         Flags Metric Ref    Use Iface
default         _gateway        0.0.0.0         UG    0      0        0 eth0
192.168.3.0     *               255.255.255.0   U     0      0        0 eth0
may you need to add:
# route add default gw 192.168.3.1

# dhcp-lease-list

# udhcpc -i eth0